

 The total runout symbol is used to control the radial deviations of any surface elements of a cylindrical feature (also able to be applied to flat surfaces that are perpendicular to a datum axis). The radial deviations of that feature are taken with respect to an axis of rotation established by the referenced datum feature.
Total Runout Symbol and Callout
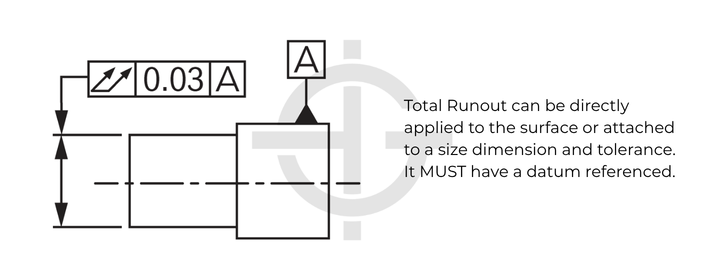
Total runout is controlling how much one feature can vary with respect to another feature (identified as a datum) when the part is rotated 360° around the datum axis. It is typically a control on a cylindrical feature and limits how much variation its surface has with respect to the rotational axis. It is essentially how much “wobble” occurs in the entire surface of that feature as it rotates around an axis.
Total Runout Tolerance Zone
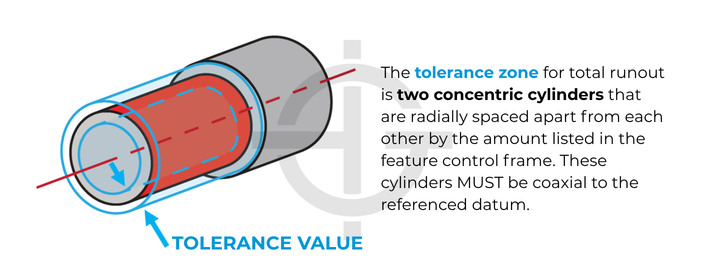
The tolerance zone is two concentric cylinders, one inner and one outer, that are coaxial to the datum axis. All of the surface elements must fall within the zone. The value of the feature control frame for the total runout tolerance is the radial distance between the two concentric cylinders that establish the tolerance zone.
How to Inspect Total Runout
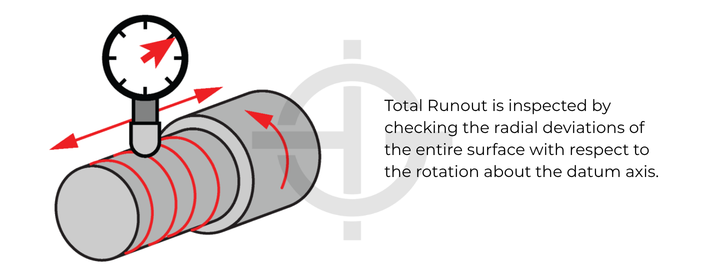
Total Runout is measured by using an indicator that is placed on the surface of the feature. For drop indicators it’s important to ensure the indicator is normal to the surface and perpendicular to the axis of rotation. The datum axis is created by engaging all surface elements of the datum feature and rotating about this datum feature. The axis of rotation creates the datum axis. The axis of rotation can be created by using V-Blocks, a collet or chucks on a lathe or even bench center. The part is then rotated around this axis, and the variation is measured using the height gage held perpendicular to the part surface. While the feature is rotated around the datum axis, the indicator must also be translated along the surface of the feature being inspected. If the gage does not vary by more than the runout tolerance, the part is in spec.
We cover the intricacies of total runout, how it’s interpreted, how it’s inspected, and the miscellaneous things you should know about this symbol in our GD&T Fundamentals Course as well as our GD&T Inspection Course. These courses show you everything you need to know about total runout and then some!
Example and When to Use Total Runout
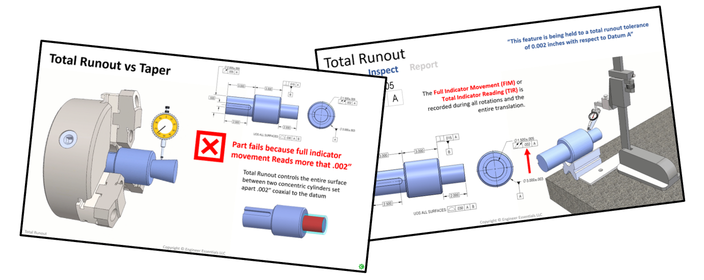
Total runout is much less common than circular runout due to the tight constraint it puts on an entire surface. However, it is still a fairly common symbol in Geometric Dimensioning and Tolerancing due to its functional effect of preventing vibration and oscillation for rotating features. It is very effective at preventing surface taper of a cylinder. Any time a part rotates and has a large amount of surface contact, total runout may be required. Things like large pump shafts, transmission shafts, and complex gears are all cases where total runout is used.
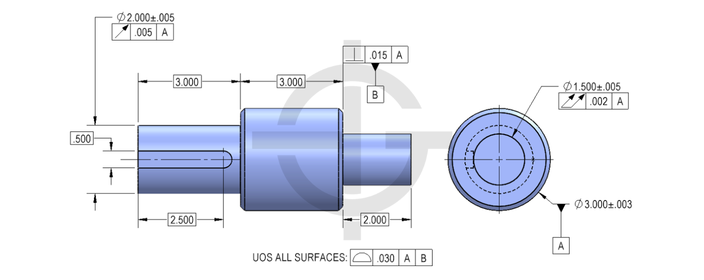
Similar to Circular Runout, Total Runout allows the functional specifications or conditions of the part to be called out directly, thus controlling how the part reacts when it is rotated.
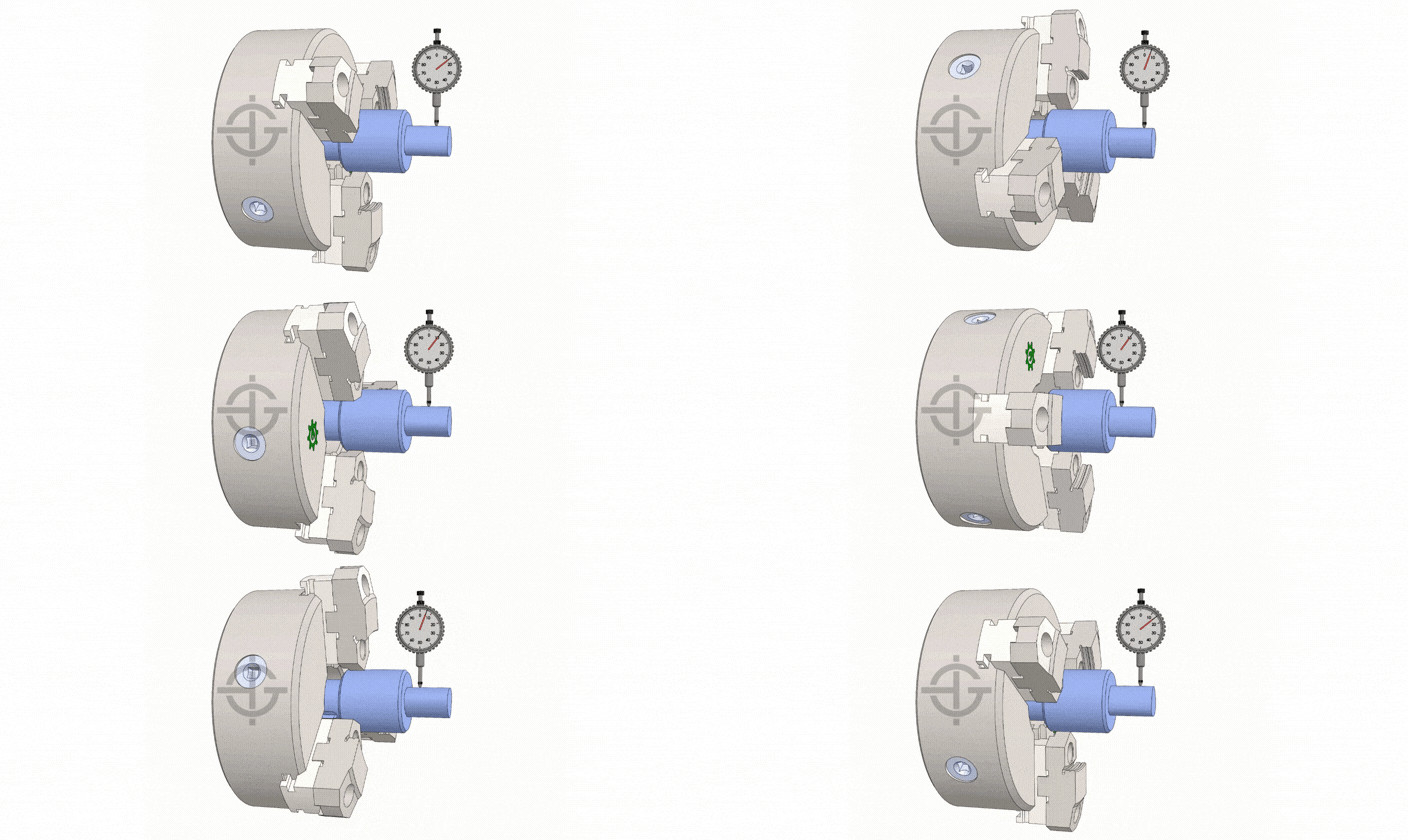
The gage to check this part for total runout would also be nearly identical as the normal runout gage. The only difference would be that you move the gage up and down the length of the feature. This allows the entire surface to be held to the same tolerance variation.
Total Runout vs Other Symbols
Total Runout controls: Perpendicularity/Parallelism (feature of size axis), Cylindricity, Circularity, Straightness, and Circular Runout.
Perpendicularity for a surface can also be uniquely controlled. When applied to a flat planar surface, total runout controls the flat surface between two parallel surfaces that establish the tolerance zone.
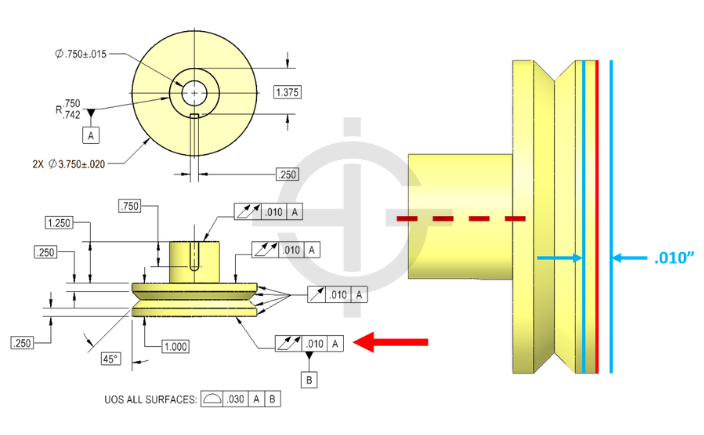
The inspection of this feature is very similar to total runout on a cylinder. The indicator is held normal to the surface, and translated along the surface, however the surface in question is now simply just a flat surface, perpendicular to the datum axis.
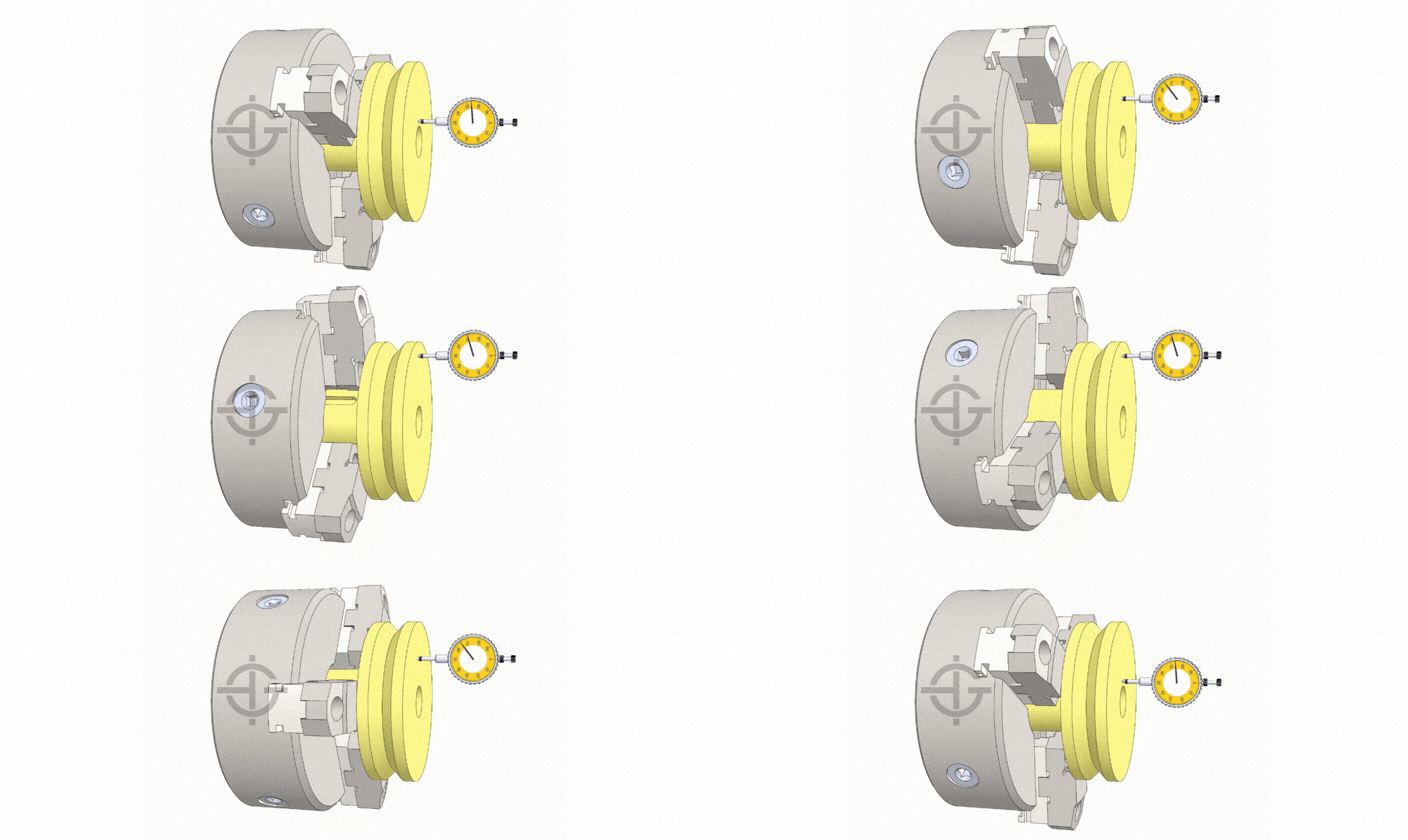
Parallelism of the two features (datum feature and controlled feature) would be controlled because if the central axis is offset by an angle, the end of the workpiece would runout far more than the side closer to the datum.
Cylindricity would also be controlled because any form variation along a cylindrical surface would show up in the total runout. If the feature is a cylinder, any circularity or straightness would cause the height gage to fluctuate, even if the part is perfectly coaxial.
Axis Straightness is controlled because any bow in the feature would cause the end of the piece to have a larger runout at the end of the work piece. Surface Straightness would also be controlled because you are now controlling any form variation across the entire surface. (This would control whether the part is a cylinder or a tapered feature.)
Circularity is controlled because any form variation along surface would be picked up by the total runout measurement.
Total Runout is, of course, the 3D version of Runout, or circular runout. (The term “runout” on its own always implies circular runout.) While total runout takes the surface of the entire part in a 3D tolerance zone, runout or circular runout only captures the cross-section of the part.

All Symbols




































Hello everyone;
My name is Ralph.
I have a question regarding Runout and Total Runout.
I have asked many engineers over the course of my career and I get different answers from all of them.
Some of them don’t even answer me and others just say they pull a number out of the air.
I don’t think that is correct.
My question is how do they calculate what the tolerance is for runout and total runout.
I know how to calculate position: T=H-F and T=H-F/2.
But I have never gotten an answer from anyone. Not even an instructor teaching GD&T who has a PHD.
Can anyone answer this for me.
Thank you.
Ralph
Runout is combining circularity with your normal position calculation. Your position calculation T=H-F is used for clearance applications, while runout is typically used in precise fitting application where wobble is controlled. No-one can ever tell you off hand how much tolerance to put on anything without knowing a boatload of information and being able to test the application. If you part functional properly within your testing cycle, then it is a good tolerance to have. It is very often a balance between design and manufacturing requirements.
How can we define the runout or the total runout value? Is there any chart for it? What kinda parameters that we need to pay attention for calculation; revolation, length, material, etc???
Can i use this for flat face of rotating part like thrust face of crankshaft & Camshaft??? if yes how this will act??
Pritam =
Yes, you can use total runout to control a flat face that is normal to the datum axis. When you apply runout to a flat face you’re controlling the wobble of the surface. Assuming that you’re shaft is your datum and your’e attempting to control a thrust face normal to that datum you’re tolerance zone (if using total runout) is simply two parallel planes normal to the datum axis. Note that the runout control in this manner would also restrict flatness. I’ll also point out that while you can do this, it’s much more straightforward and common to see this face controlled with perpendicularity. Preference and common use in your particular industry I suppose.
I hope this helps.
Cheers,
Matt
Does Total runout control the Datum as well? since the part is rotated around the datum so it has to stay within the cylindricity tolerance?
No, since your measurement is only on the feature being called out, and nowhere on the datum. You would need to call this separately.
Hi, we have gears that needs the total runout. However, there is no control datum to be referenced of (plastic parts’ surfaces have draft angle). From reading this page, I think that we can only use an axis for the referenced datum. However, you only have the example with datum being a surface. Can you please add one more example with datum being an axis.
Many thanks.
Hello – The datum may be pointing to a surface, but it’s the surface of a cylinder – that cylinder has an axis and that is your datum axis.
It was stated that the total run-out cannot vary more than 200microns/0.2mm. Is there any standard reference for the said tolerance?
Many thanks.
Waikit –
The stated limit of 200 microns is directly from the feature control frame tolerance value stated in the example. There is no set minimum or maximum, it all depends on the size of your part and what kind of control you place on it. I’d recommend you read more closely into Section 9 of the ASME Y14.5 – 2009 standard. Feel free to ask further questions if they come up, we’re happy to answer.
Cheers,
Matt
Great information. I work with very tight tolerance sliding spools. This has been helpful when determining how to handle parts that have been dimensioned differently through the years. Having one callout (TIR) that can control all of the criteria that are important for the function is great.
Also, you have a small typo: Total Runout Controls: Conentricity, <- should be conCentricity.
Thanks for the positive feedback and for the heads up on the typo. We’ve been focusing the majority of our effort to developing our advanced GD&T course but we’ll be circling back soon to update and improve upon our website as well.
Cheers,
Matt
Hi, I want to ask about total runout to measure gear.
What equipment is the best to use for this measurement?
I have heard of the German Klingelnberg machine used for measuring most criteria of gears. I assume it is very expensive though.
Can you correct the first picture, please? (Total) run out is not applied to axis!
And… why you have added diameter symbol in your example picture? What this it means?
Correct – This was a carry over from concentricity and we forgot to remove the Ø symbol. Runout never uses the diameter symbol. Only Straightness (cylindrical feature of size), axial orientation, axial true position and concentricity should use this. Thanks for spotting the mistake!
Is there a difference between Total Indicated Runout (TIR) and Radial Error? I’ve seen both used, and was wondering what the difference was… surely there’s a difference, right?
Total runout is as described above, where radial error is not a GD&T term and thus not always clearly defined I would interpret radial error the difference between your desired location and your measured location radially. This could also be interpreted as the position tolerance in GD&T. Total runout is a dual surface and location control of a rotating object., where as position tolerances only control location. I hope this helps!
Why in the picture you’re saying that gauge cannot vary more than 30 microns ? while FCF states for 0.2 maximum (assuming are mm) this would be 200 microns variation right?… (or maybe 1 micron isn’t 0.001mm? ) you may be using different units conversion; please help me to understand, thanks.
Sorry for the confusion – It was a typo. The example should be fixed now to reflect 200 microns/ 0.2 mm of total runout.
Thanks for letting us know!
For better understanding of total run out, i just asked with one practical example. When we are making a Shell roller fitted with shafts at both ends. The operation details will be procurement of Sheets, Sheets rolled & joined through welding to form like shell, then end shaft fitted with the shell through welding. after that machining only the end shafts being the shell roller wall thickness will be only 3mm. Therefore we cant machine in that area & moreover not necessary to machine the shell too. Maximum permissible total run out allowed is 0.5mm. After manufacturing the roller, if we check, there maybe possibilities to exceed the limit. To control the same, Is there any formula or calculation available to control the process from starting. To achieve the tolerance, this will be the maximum permissible straightness allowed in the sheet. After rolling the sheet, this will be the maximum permissible cylindricity tolerance allowable in the shell. if it exceeds at this intermediate stage, then that at final stage, the total runout cant be achieved. So that the process can be controlled & rejection at final stage can be avoided.
Awaiting for your valuable reply.
Dear Sir,
Gone through all your GD&T’s. Explained simply & very easy to understand. Expecting more to come. Few clarifications required.
1. As Explained in this web, Total Runout = Concentricity + Cylindricity. In that case, shall we measure Both concentricity & cylindricity individually, & when we sum up whether can we come to a conclusion it will be the maximum total run out in that part.
2. To measure Total run out, with reference to datum, Whether we have to move the measure gauge in the same axis ( i.e., in straight line) , or we can vary the measurement axis.
3. Is there any difference between Total Indicated runout ( TIR) & Total runout.
Hey Thanks for your comment, It allowed me to rethink how to present the material so everyone can better understand.
1. Total runout controls many of the other symbols, however unlike circular runout, you could not just measure the two components to get the resultant tolerance.
Runout and Total Runout can capture several different symbols at once under one measurement which makes them fairly common and practical. Runout is especially easy to measure compared to its components of circularity and concentricity.
2. Total runout is a little more difficult to measure because your height gauge must remain at a fixed height and normal to the surface you are measuring. It is often enough to control runout alone for many functions, and then specify a straightness (or angularity for a taper) tolerance, to ensure the form is consistent along the surface.
3. Total Runout is a technical term from the ASME and ISO GD&T standard that we described above. However, when you hear the term “total indicated runout”, usually it is referring the combination of angular runout (if you have a drill bit cocked at an angle while it is rotating) and radial runout/concentricity. (how offset the drill bit is from the chuck or collet). This is refered to as total indicated runout because it is a combination of both these components. It is a common industry term equivalent to just the basic term “runout” .
Here is a good link to understand this further – http://www.precisebits.com/tutorials/tir.htm
Many thanks for your detailed & immediate reply. When we measuring total runout, For an example, if at first measurements point the measurement gauge varies from +.1 to -.1. At second measuring point, it shows +.1 to -.2. at third measuring point, +.3 to -.1. In this case, what will be the maximum runout in that component. Whether can we to take the two maximum readings. i.e., +.3 & -.2. Therefore total runout will be .5 in that component.
Gone through all GD& T symbols and their explanations & found very nicely explained. Still it is requested to give thought on explanation on final size of a feature with consideration of feature tolerance and GD&T tolerance. This will be helpful.
Thanks for the feedback! If you check out our section on Max Material Condition and Least Material Condition, you can see how in GD&T you can create controls that limit the size and geometry at the same time. We will also be releasing in the coming weeks a page on Rule #1 of GD&T called the envelope principle. For the ASME Standard, this rule controls the form of your part when a size dimension is used.