

 The Least Material Condition Modifier is a symbol that utilizes actual size of a feature relative to the Least Material Condition (LMC) of the feature to modify and assign additional tolerance to a geometric control. The LMC is the condition of a feature where the least amount of material (volume/size) exists within its dimensional size tolerance.
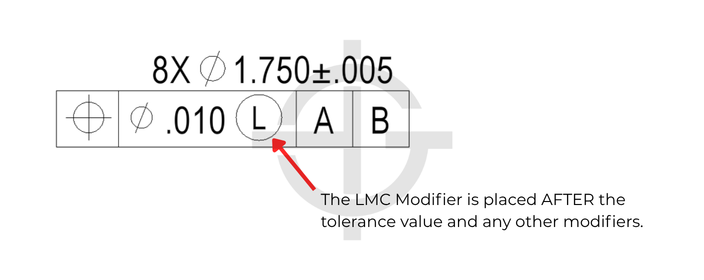
Least Material Condition Definition
In order to first understand the Least Material Condition Modifier, it’s important to first understand what the Least Material Condition is. All features of size have a least material condition. In fact, those same features also have a maximum material condition. The maximum material condition, MMC, is the condition of a feature where the maximum amount of material (volume/size) exists within its dimensional size tolerance. Conversely the LMC is the condition of a feature where the least amount of material exists.
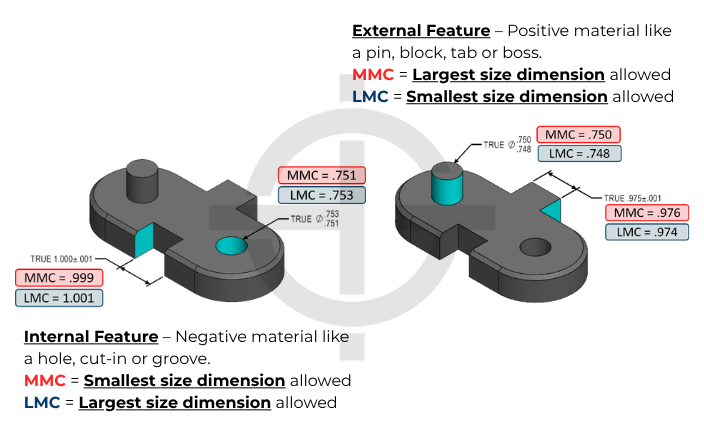
The MMC of internal features will be the smallest size allowed by the dimension and associated size tolerance. The LMC of internal features will be the largest size allowed by the associated size tolerance.
The MMC of external features will be the largest size allowed by the dimension and associated size tolerance. The LMC of external features will be the smallest size allowed by the associated size tolerance.
If you want to ensure that two features on a part don’t begin to overlap each other and create minimum wall thicknesses that cause structural issues, the LMC is a good size to pay attention to.
Bonus Tolerances
There is some magic that happens when we apply the LMC Modifer to a feature control frame. The LMC modifier changes the make up of a feature control frame and literally changes the interpretation.
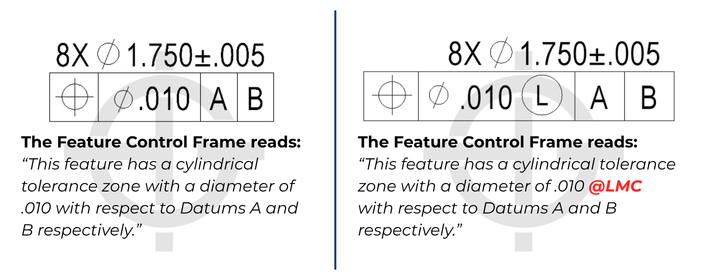
Assuming this is applied to a weight reducing hole like we show on the flywheel example below, the LMC for both callouts is 1.755 and the MMC is 1.745. However, they are not the same callouts. The addition of the modifier will do exactly that. It modifies the Ø0.010 value depending on what the feature ACTUALLY measures. If the feature measures AT LMC, or in other words, it measures at 1.755 for this example, you get Ø0.010 position tolerance. You will always get that. However, if the hole measures at 1.745 ,which is smaller than the LMC, you get more room to deviate functionally without affecting a minimum wall thickness. Therefore, you are allowed more tolerance. In that instance, the 0.010 is modified by the exact amount that the hole deviated from the LMC of the feature. This is informally referred to as bonus tolerance.
You are directly trading size for position/orientation. This means that if you make a pin or a boss larger, you have more material and thus can have more location/orientation deviation without worrying about min wall thicknesses. And for an internal feature like a hole, if you make the hole smaller you also get more bonus for yourself. This bonus can be added to the GD&T tolerance and would increase the geometric tolerance.
Bonus Tolerance = Difference between MMC & Actual measurement
Please note that this symbol is rarely used because it applies bonus geometric tolerance when a hole gets smaller, which is the EXACT OPPOSITE of what a clearance hole for a fastener or a hole that is clearing another component would functionally need. In those instances, consider the MMC modifier instead.
The GD&T Symbols where Least Material Condition can be applied are:
- Straightness (Derived Median Line only)
- Flatness (Derived Median Plan only)
- Parallelism (FOS)
- Perpendicularity (FOS)
- Angularity (FOS)
- True Position – very common
Visualizing the Math and the Boundaries
Let’s use this simple assembly and drawing to demonstrate the bonus tolerances and use case for the least material condition modifier. The drawing below is of a simple flywheel. The pattern of 8 thru holes ARE NOT for fasteners but rather purely weight reduction holes.
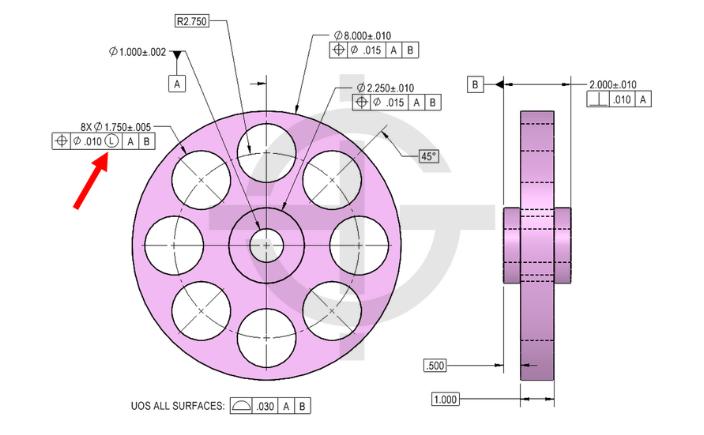
We will allow a certain amount of size variations on the thru holes via the size dimension/tolerance. We will also allow a certain amount of location/orientation for the thru holes relative to the datums via the position tolerance.
This interactive tool lets you see for yourself how the size of the hole will affect how much position tolerance the hole can have functionally. Toggle the LMC modifier on and off to see that when it’s off, regardless of the features size, the tolerance zone never changes. But with the LMC modifier applied, the tolerance zone grows due to the bonus tolerance being added.
You can see firsthand that when the hole gets a bit smaller, the hole can deviate a bit more as well and still be functional, meaning it maintains a min wall thickness to the outside diameter as well as the adjacent holes.
Additionally, there is a “Outer Boundary” button that will toggle the worst-case boundary of the feature. You will notice that this is only available when the LMC modifier is applied. That is because the LMC modifier is a tool that creates constant boundary worst case that can be used to calculate worst case min wall thicknesses.
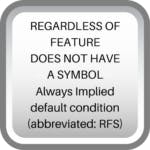
When there is not a call out to Least Material Condition, the part by default is measured regardless of feature size (RFS). This means there is no bonus tolerance, and the envelope of the part is not defined and the worst-case envelope changes based on the size of the feature.

All Symbols




Hello Sir,
If we are using ring gauge as a No-Go gauge to measure least material on pin, only both ends of pin will be checked. How will we ensure that in between points will be least material only, it can be less than desired LMC?
a set of two-point caliper measurements would suffice for this – every one of them would need to be greater than LMC
I have an application for LMC that’s not discussed here.
The part has a hole in it that a pin drops into place and holds a spring. The spring will be pulled into tension and the force matters. Any positional change of the hole will change stretch of the spring, and thus it’s forces. Likewise, if the hole is over-sized the pin will shift to the one side due to spring forces, and reduce the force of the spring. So MMC in this case would be the worst option, because the larger the hole the more it can shift, doubling up on how it affects the spring forces. However, if you were to use LMC in this application, when the hole size is the largest (allowing pin to shift more), the tolerance band would be the smallest so not affect it as much.
Of course, its still possible to use MMC (or RFS) as long as there is enough leeway in the system (or designed into it) to allow it. But this is a different case where MMC isn’t the best and LMC would actually be better.
Hey JP – This is a great application! I am so glad you shared this with us. LMC is so much more rare than MMC in the industry – but this is a really interesting application that fits the concept really well!
HI,
In geometric tolerance, what is the definition of ø 0.2?
is it plus or minus 0.2 ?
or other?
Thirumoorthi –
Geometric tolerances that have a diameter symbol in front of them indicate that your tolerance zone is cylindrical. As long as the axis of the hole exists entirely within the aforementioned cylinder your part is in spec. The axis of the hole is free to shift and tilt in any manner so long as no part of the axis falls outside the tolerance zone.
Please check out our GD&T Basics Course! We have a number of price points to meet any need and our team is currently hard at work refining our advanced course. There is material for every skill level. Please check back at any time.
I hope this helps.
Cheers,
Matt
I still don’t understand L or M and I feel you can achieve the same with tolerances
James –
Ok, so first lets talk about MMC vs LMC in the feature control frame, not next to the datums. This is essentially telling you what material condition the tolerance is to initially be taken at. MMC is the max material condition, or the condition that results in the heaviest version of the part. Smallest internal feature, largest external feature. According to the standard as you depart MMC (or LMC) you get a ‘bonus’ tolerance equal to the amount of departure from the stated condition. If you have a tolerance of .050 at MMC and a hole size of 2.65 +/-.02 you MMC would be 2.63 and your tolerance for that hole would be .050. Then as you move away from MMC you gain tolerance like so: For a 2.65 hole you get .070 worth of tolerance and at 2.67 hole size you get .090.
As a thought exercise please do the following as if you were locating the center of a hole. Create a traditional cartesian coordinate system (that is X and Y axes). For an arbitrary part we are going to say it has a dimension D +.5/-.5 in both the x and y direction. What matters here is the tolerance zone for the location of the hole. You now have a square zone of area 1 that the center of your hole has to be located in. This is the method you are used to seeing.
Now, draw a circle around this box such that the four corners of the box touch the insides of the circle. Which of the two shapes has a greater area? The circle right? If you do the math you’ll find that it’s bigger by about 57%. Why does any of this matter? Because someone at some point sat down and thought that using the traditional method if they had a part with hole axes located at the corners of the box located a distance r = sqrt (.5^2+.5^2) why can’t that apply to the full 360 degrees of the tolerance zone vs just four corners?
It’s through this method that you get to keep the same tolerance you’ve always had, but by applying it to a cylindrical tolerance zone vs a square one you actually gain 57% in terms of area for good hole axes to fall into. This means fewer rejected parts and less money out of your pocket!
This is a lot to throw at you, but I would encourage you to consider taking our Fundamentals of GD&T course offered on our website. There is a wealth of information that is only going to help you be better at your job.
If you have further questions please don’t hesitate to ask.
Cheers,
Matt
How would we dimension the hole size so the machinist aims for LMC
Soozi –
If you have a 1 inch hole and want to make sure that the machinist aims for that value you can do this using tolerances. For instance: 1 +.000/-.050 Every dimension must have a tolerance, whether directly stated or as part of a feature control frame. Using this method indicates to the machinist that the design works best at 1 and nothing more. There are several ways of doing this and this just represents the simplest method.
I hope this helps answer your question.
Cheers,
Matt
Thanks Peter Torresani
May anyone explain bonus tolerance with LMC, with calculations and physical interpretation.
I’m always amazed at how poorly the application of LMC is understood. Years ago I discussed it with one of the people on the ASME board, and he didn’t understand the practical applications either. The rule of thumb for the the material conditions is pretty simple. If the goal is to ensure two features fit together, use MMC (most common). If the two features self-center as with a flat heat screw or press fit dowel, use RFS. And to the point of this comment, if the goal is to ensure that when assembled the two features will align something properly, use LMC.
For example, if you have a corner positioning block with clearance holes for dowels, the reason for the dowels and holes is to ensure that the outer edge of the block is within a allowable range when installed. If the clearance holes are bigger, there is more movement between the dowel and hole, so you cannot allow as much positional tolerance to the hole. Another way to understand it is that the walls of the clearance hole can only extend so far from the center of the dowel. The bigger the hole, the less the center of it can move.
This example is nice, because it provides a use for RFS (the press fit dowel hole) and MMC (the clearance hole for the screws holding the block in place.
Peter –
Good rules of thumb you’ve summarized the needs for each modifier pretty well. The other classic example of using LMC is when you are trying to maintain a minimum wall thickness for some application.
Thanks for contributing.
Cheers,
Matt
Thanks. Nice thumb rule
what i understand about LMC is, it is provided for the features (like holes in flywheel) which does not have any significant function, yet we wan to maintain the wall thickness. Can you please give me more examples where LMC is used for better understanding?
I’ll be honest – other than maintaining wall thickness and clearances, it really does not have many more uses as there are rarely situations where you want your geometric tolerance to get bigger as the part approaches the MMC size. MMC is probobly used 95-99% of the time compared to LMC (depending on the industry you are in as well)
This is the best way you made me understand about LMC .Thanks 🙂
Hi, Thank you for your useful content. when I read about (LMC); I don’t understand usage of it’s (LMC) in GD&T. Is it possible for you that display this issue in figure with dimension.
LMC is not too common in GD&T mainly for the reason that it is usually the opposite of what you would like to exist functionally. One use for LMC that helps to understand when it should be used is for when you are adding a hole to a flywheel. You are not inserting anything in the hole, its only there to minimize weight. Your main goal then is to make sure that the hole does not get too close to the edge of the flywheel that the wall thickness is too small. Often times with LMC you are making sure you have enough “meat” in a structure so that it is not too weak. This is one application, but it is probably the most common use.
Thank you; but I don’t understand yet.