We would like to shed light on an interesting discussion stemming from a question asked in our Print Reading and Tolerances Course. A student shared their viewpoint about the correct use of centerlines in engineering drawings, which was a bit conservative as they were missing a key application of this essential drawing feature.
Since questions about centerlines are very common and new learners often fail to recognize the entirety of their utility, we thought it is best to share the insightful video on our blog. Before you move on to the video, it is better to review the topic.
What are Centerlines?
Centerlines are one of the most frequently used tools in engineering drawing. Their basic purpose is to show circular/cylindrical features in a drawing, which are found in abundance in mechanical parts. Common examples of such features include bolt holes, pins, discs, etc.
Figure 1 shows how a centerline looks, characterized by its long-short-long alternating line pattern.

These simple lines play a very important role in the accurate interpretation of engineering drawings. We will highlight their main functions one by one below.
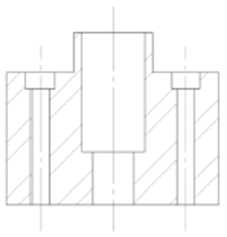
- Centerlines indicate a circular feature on a drawing. In 2D, most circular features look exactly the same as features with non-circular geometry. The only way to tell them apart is by adding a centerline, which represents their central axis and confirms their geometry. The cross-section view shown in figure 2 can help clarify this; without the centerlines, the ‘holes’ would be considered rectangular in this part rather than circular.
- Centerlines are used as a reference to dimension circular features. Whenever you want to dimension a circular feature, it is best to use its mid-point as a reference. In figure 2, if one wants to show the distance between the holes or the holes and the side edges, one would use the centerlines to do it rather than the walls of the holes.
- Centerlines also indicate the co-axiality of features sharing the same central axis. This might seem an unnecessary application but it holds immense significance from a Geometric Dimensioning and Tolerancing perspective. If two features are meant to be co-axial, a shared centerline enforces this relation. For example, in figure 2 all three centerlines connect two different holes to each other. If the designer did not intend to make them co-axial, they would have used two centerlines for each set of holes.

This last point about co-axiality is exactly what the aforementioned learner was not considering. He argued that centerlines serve a dimensioning purpose only and that they should not be added to a drawing if there is no dimensioning involved. After watching this video, we are sure you will be clear about all three applications of centerlines we discussed above.
Here is the video text:
This is a nice little refresher, which is a very simple question on centerlines and the rules behind them. Jamie asked: “What is the rule or best practice for representing features centerline marks on multi-view 2D drawings?
particularly when in the other views on the feature is represented as hidden?”
So maybe there are some hidden views here, and the geometry is internally in a part that’s difficult to center. “I am of the school of thought, it is not required to show center lines marks for features alternative use unless they serve a dimension purpose.”
Yes – you are right about this “dimensioning purpose”. I want to make sure everyone understands the reason we use center lines, to begin with.
They should serve some sort of dimension purpose and they are optional if you don’t have that. However, “dimensioning purpose”could mean an example like this where we’re trying to dimension where the centerline to the centerline of a hole is, but, this center line right here (and I want to make sure everyone sees this), is also serving a dimensional purpose on its own. This gets into the rule of what a centerline actually is.
A centerline not only represents the center of a feature it also represents a location and orientation (in GD&T specifically), or a basic dimension of zero between this axis and this axis. You might say, “Wait a second, those are the same axis!” and I will say “Actually no they’re not…”
You are never telling a machinist how they have to machine apart when you’re a design engineer. You’re only listing what the requirements have to be. So, maybe I come in and I machine this hole, I flip the part over and I drill in this hole now (or, the other way around too). Or maybe I do the thru-hole first and then I do the counterbore(which is probably how they do it). There could be some shift in the axis of those holes – there could be some movement in the fixture.
From a microscopic point of view or down to the truth of this, those will have two different, separate axes since they are two separate features. So, we would need to have the centerline to show that in a perfect world the basic dimension or the goal of these is to be the exact same axis. That’s why on many drawings we have some sort of general position (like unless otherwise specified – You may see you all UOS or Unless Otherwise Specified
.010 or something like that). What that means is that if you were machining this, we need some sort of tolerance of how far this hole can be from this hole. Well if I don’t list anything then they can be .010 apart. So, this could be shifted over .005 in that direction that could be shifted over .005 in that direction.
That’s probably acceptable, or maybe it’s not. So center lines also serve us
that purpose – beyond just saying that they’re dimensions from hole to hole, (the location linearly like that) They are also showing that coaxially, these are 0 basic dimensions. This is something a lot of people miss – You may not have position tolerance here, (unless otherwise specified, on all axes)
within .001 of each other. Now that’s a little more vague because
some people might not know what that means.
Position is very clearly documented in the standard. But you still need the centerline in if you are dimensioning, because say how far of these axes can be or how far off can the counterbore be if you are dimensioning from the axis of that hole. So the rule of thumb would be, yes, you need them for dimension purposes but you also need them for dimensioning purposes if there is more than one feature all along that centerline. So, if there is more than one feature along the centerline you do have to show them on your drawing.
You can see here that I’ve done a section view for that part on here, I use sections on here. You can see that I’d given the centerlines here to show that all of these exist on one center It’s to add clarity to our print. You have to have that to make sure everyone knows and doesn’t give you a part where this axis is off from this axis because you never listed how far off they have to be. The other thing to remember is when you are dimensioning to a centerline. (Let’s say we had 10±.025 from hole to hole.) Keep in mind this is like having a 2X there, because we have one axis here in we have one axis there. We have one axis here in one axis here too.
That’s why datums and GD&T add clarity because there are ways this can get screwed up if you do it this way. But, if you just have coordinate dimensioning on here you have to remember that there are two features we are dimensioning – there are actually two axes here and have to be held within this.
By the way, all of this information we just mentioned is in our Print Reading and Tolerances Course. Be sure to sign up – it’s brand new. It covers these fundamental rules of engineering drawings that exist before GD&T even is put on the print. We walk about centerlines in the Print Reading and Tolerances Course and we have an entire lesson just on section views which are ways to do this. So be sure to check that out let us know if you have any more questions on center lines because these are something that come up quite a bit.
Interested in Receiving More Engineering Print and GD&T Tips?
Sign up to join our mailing list and also receive a free GD&T Wall Chart
Join our Mailing List

I like your article. Many designers fail to use them at all. Another main function of the centerline is to show symmetry of a part or assembly.
Absolutely, a section view doesn’t imply it’s a symmetric part, but so many people think it’s enough. With the loss of the symmetry callout (which was unnecessary, sure, but easy) – I think it’s vital to keep up with centerlines and center marks!